Monday, 10 May 2010

3 Tools for Exploiting the Wifi During Presentations

Coming as I do from a background in language teaching that emphasises that the teacher should shut up and get the students to do the talking, I often feel uncomfortable doing conference presentations, many of which still follow the format of; speaker gets up in front of audience with presentation - does presentation - audience listen (try to stay awake) and desperately try to think of a few questions at the end to prove they were awake and listening.

One of the gifted- Jamie Keddie.

There are of course a few gifted speakers who can hold the audience’s attention for a full hour and keep most of them listening and awake. If like me you’re not one of those, then here are a few tools that, thanks to the increasing availability of wireless connectivity at conference centres these days, might help to turn your passive listeners into a bunch of multitasking audience collaborators.

Set up a backchannel
One of my favourite tools to use during presentations is Today’sMeet http://todaysmeet.com/ . It’s a great tool for setting up backchannels. A backchannel is basically what your students create when they talk among themselves or text each other during your lesson.
  • The advantage of setting one of these up to allow your audience to do this is that you can capture and share what your audience is saying while they are listening to you and enable them to collaborate and share with each other what they know about the topic and links to any relevant resources.
  • It can also help them to type in questions as they think of them rather than waiting for you to ask at the end, and for me it’s a great way to pass out URLs to interesting websites to give the audience some hands on participation during the presentation.
  • It’s also a good way of getting the audience to brainstorm and do tasks together, just ask a few questions and get them to type in answers, and they’ll appear in the backchannel window for everyone to see.

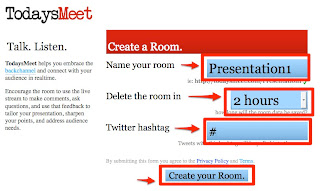
Setting up a back channel with Today’s Meet takes about 60 seconds. You just type in a name for your channel and launch it. You can select how long you want the channel to be available (from two hours to a year) and if you have people in your audience posting updates to Twitter, you can select a hashtag (#) specific to your talk so that their ‘tweets’ appear alongside the backchannel chat window.

Live polling
Getting audience response during presentations can be done quite easily by getting a show of hands, but I tend to find that pretty unsatisfying in terms of capturing and sharing data, so I’ve started using a polling / survey tool called Urtak http://urtak.com/ during presentations.
  • With Urtak you can prepare a number of short online polls to to get your audience to do during the presentation.


  • Just send the URL to them using your backchannel and then you can show and capture your audience response live during your session, as Urtak collects and shares results as soon as people vote.
  • If you are logged in during your presentation it’s even quick and easy enough to create short polls on the fly and pass out the URL through your backchannel.
Here’s an example one I created for a presentation on digital teaching skills that you can look at: http://urtak.com/u/1826 . Urtak even enables the audience to add questions if they register and log in.
Make note taking collaborative
Many listeners at presentations do their best to keep notes during presentations, so if your audience has wireless connectivity why not get them to do this collaboratively? A great tool for doing this is Sync.in http://sync.in/ .

  • It has a desktop launcher that your simply click to create an online collaborative note taking pad. You then share the URL for each pad with your audience and they can then work in groups to assemble notes and comments on your presentation as you go or work on collaborative tasks that you can set them.
  • The texts can then be saved by each person at the end of the presentation or they can even continue to refine the notes after the presentation is over. Sync.in also has a handy text chat room which runs alongside each document that’s created, so collaborators can discuss things and ask questions as they work. See Collaborative Text Editing Tool for more information on Sync.in.
Of course these tools aren’t just useful for conference presentations, but can be used for online training webinars as well as classroom teaching if you work in a wireless enabled classroom environment. Be sure to practice with them one at a time first for short tasks as you gradually build them in to your presentation skills repertoire.

Good luck and I hope you find these tools useful and soon have your audience multitasking as well as listening.

Related links:
Best

Nik Peachey

Monday, 3 May 2010

3D Computer Games with Young Learners: Spore

In a recent digital skills survey I carried out using Urtak I discovered that more than 50% of digitally skilled teachers don't feel able to utilise 2D and 3D computer games to achieve pedagogical goals (See survey), so I've been looking around and exploring some possibilities. The first of these is the Spore Creature Creator. Spore is a game which allows you to create creatures and evolve them along with their environment, all the way through to a space traveling society.

The free trial creature creator that we will be looking at allows you to create creatures, take snap shots of them and make videos of them to see how they move. Here's an example of a video I created to get students interested. I added the captions and text using i-Movie though you could just as easily use a free online video editor such as Video Toolbox or Windows Moviemaker if you are using a PC.


The creatures are very easy to create, you just drag and drop different features onto a body and the add colour and test them out to see how they move. These are some of the other creatures I created.


Once you have created your creatures you can either make videos of them, take snapshots, which you can either save or email to someone, or create an animated gif of your creature (I wasn't too impressed with the quality of the animated gifs)

Here' a tutorial showing you how it's done.


You can download a .mov version of the tutorial here or this pdf document has the main screen shots and instructions if you'd prefer to follow on paper.

You can download the Creature Creator from the Cnet website here. It's a big download (205MB), but once you have it, you don't need to have web access to do any of the tasks or create the movies and snapshots.

How do we use this with students?
  • Create images of different creatures and get the students to create a story about them.
  • Get the students to create descriptions of different creatures - This could include appearance, but also likes and dislikes, habits etc.
  • Get students to match pictures to descriptions.
  • Get students to create a creature based around your description.
  • Create a creature and use a picture of it as a picture dictation with one student describing the picture while the other one recreates the creature using the software.
  • Get students to create a short video of their creature and add a description and narrative below it as a video project.
  • Ask students to create a creature suitable for a particular environment, or types of tasks, then get students to discuss which they think would be best adapted for the environment.
  • Get the students to write instructions for how to create a creature.
  • Use the creatures to demonstrate present continuous tenses ( sitting, running etc.)
What I like about it.
  • It looks great on a data projector and if you work in a single computer classroom, you can get students up and dragging things around and creating in front of the class.
  • The creatures are very colourful and in the environment mode they really start to take on character.
  • You can use the tool to create versatile and stimulating materials.
  • It's free and pretty easy to use once you get it installed.
  • I like the integration with YouTube as it makes it very easy to get your videos online quite quickly.
  • I like that they can produce a range of gestures and expressions.

What I'm not so sure about.
  • It's a big download and will need to be installed on any computer it is used on, so if you want to use it in your school computer room, you'll need the help of a supportive IT manager to get it downloaded and installed on all the computers.
  • The Gifs it creates aren't that good, but you don't really need to use them.
  • You need a fairly good computer with a good graphics card for it to work well.
I hope you enjoy trying some of these ideas with your students.

Related links:

Best

Nik Peachey

Tuesday, 20 April 2010

Creating Social Polls and Questionnaires Using Urtak

I discovered Urtak a couple of weeks ago and took an instant liking to it. Urtak is a web based social polling application that enables you to very quickly and easily create online polls and questionnaires.
The only thing you require to get started is an email address to register as it is completely free. Here’s a short tutorial showing how it’s done.


The polls it creates are pretty simple. You just type in 'Yes , No' questions or statements and then click enter, give your poll a title and instructions and click on done. It seems like you can have as many questions as you like. The longest one I created had 45. Here are a couple that I created. Feel free to try them out and answer the questions to see how they work. You'll also be able to see the results.
Once your poll is complete you can either link to it via the URL or embed it into a web page.

Once the poll is live anyone who sees the poll can answer it without having to log in or register. Viewers can even add additional questions or statements to the poll if they do register though.

What I like about it.
  • Once users vote they can compare their answers to other people who have used the poll.
  • The poll gives a feed out of information on the right and you can even cross tabulate answers to different questions.
  • It’s great that other people can add questions to the poll.
  • I like that it doesn’t give the ‘correct’ answer but shows most popular answers. This is good to keep students thinking and questioning themselves.
  • If you don’t like the questions that people add to your poll you can easily get rid of them.
  • You can embed the poll into other web based materials.
  • It’s free and really quick and easy to use.
How can we use this with students?
  • We can use it for class / online surveys and get students to analyse and write up the results.
  • We can use it for action research to find out what things we do in class students enjoy or understand or just to get general feedback.
  • We can use it to test comprehension by creating question or statements about an online text.
  • We can set web research tasks for students by asking questions and getting them to search the web to find answers or find out if statements are true.
  • We can use it to create progress tests to evaluate the effectiveness of our teaching.
  • We can use it to create debate and explore attitudes by giving students the poll before they come in to class to get them thinking around topics to discuss in class. We could also follow this up with a post class poll to see if opinions have changed at all.
  • We could use it for needs analysis to see what students feel they need to study in class.
  • We can use it to get students to self assess their progress.
  • We can get students to create their own reading tasks by getting them to produce questions in a poll based around an online text, then they can answer each other’s questions.(Great to use with Mashpedia)
  • We can get students to practice Yes No questions forms and create questionnaires to find out more about their class mates.

What I’m not so sure about.
  • At present any poll you create is added to the Urtak directory, so it would be nice to have private URLs to ensure only your students answered the questions.
  • It might also be handy to be able to disable the option to have other people add questions to your polls as you can’t be sure that what they add will be relevant etc.
  • If students go to the directory of all polls they might find some unsuitable and potentially offensive ones.
On the whole though I think Urtak is a great free tool and one that I will continue to use. It’ helped me to make designing web based materials a bit more interactive and also enabled me to quickly and easily do research that I can share and use to inform training and workshop presentations.

I hope you find it useful too.

Related links:
Best

Nik Peachey

Saturday, 3 April 2010

A Tick List of 21st Century Digital Skills for Teachers

I've just been brainstorming digital skills that I believe are required by teachers in the 21st Century. So far I've come up with 45 of them.

What's striking for me about this is:
  • few of these skills will have been taught to anyone who trained as a teacher longer than 5 years ago.
  • few of these skills are being taught to teachers training now.
  • the 21st century teacher needs to be a pretty amazingly skilled professional.
Please look through the list and tick on the ones you believe you have.

Teachers Digital Skills Tick List


Teachers' digital skills tick list

I'd also be very interested in any comments about any you think I've missed or that you think don't belong there.

Related links:
Best

Nik Peachey

Wednesday, 13 January 2010

Cropping YouTube Videos to Create Activities

Using YouTube videos with students can be really great, but finding a video with the exact language you want and at a suitable length with too many other distractions around can be really difficult. That's why SafeShare.TV is so useful.

  • SafeShare.TV is a tool that has two primary functions. The first is to enable you to share YouTube videos using a direct URL that frames the video without the advertising and other distracting features that might cause students to wander off into less suitable materials.
  • The second and perhaps even more useful function of SafeShare.TV is that it enable you to crop the video clip so that only a particular part is shown. This is particularly useful when you want to build activities or tasks around clips that focus students on particular linguistic features.
How to use SafeShare.TV
First find a YouTube clip that has a section that you would like to use. I chose this one from ‘Room with a View’ http://www.youtube.com/watch?v=Tehft3GDw6k. At 9 mins it's quite long so I just wanted to use a few sections.

Copy the URL and then go to: http://www.safeshare.tv/. Paste the link into the field then click on ‘Generate safe link’.
This will create a new link to the video which you can then use with your students to show them the clip.
When the students open the link they will only see the single video clip with it’s title, like the example below.

If you want to crop the clip so that only a short part of it shows, then generate your safe URL and then click on the link that says 'Do you want to only share a part of the video? click to crop.' This will open a small video viewer. Click the video to watch it, then click on ‘Set Start’ at the beginning of the segment you want students to see. Watch the segment and click ‘Set End’ at the end of the segment. Now click ‘OK

Once you have clicked 'OK' your safe link will be adapted to only show the section of the video you have selected. You can then either copy the link to share with students or share it through a variety of social networking mediums.


Here's a quick video tutorial showing how to do this.


You can download this video here or download a copy for i-Touch or i-Phone here

How can we use this with students?
Clipping videos makes it much easier for us to create activities and tasks that focus on specific areas of the video clip without having to watch the whole thing.
  • You can select example phrases to show the use of language in context, such as a telephone call or a scene that shows someone booking into a hotel etc.
    Here’s an example: Booking a hotel room This was trimmed from a much longer clip on YouTube
  • You can show students the beginning to a clip and ask them to predict what’s ‘going to’ happen next.

    Here are two examples:
    1. What's going to happen?
    2. What's going to happen?
  • You can show the beginning and end of a clip and ask students to predict what ‘has happened’ in between.

    Example:
    They watch this one
    Then this one
  • You can show students a number of sections from the same clip and ask them to order them either by using linguistic or visual clues and explain their rationale.

    Here are 5 clips for you to try to order:
    Clip 1
    Clip 2
    Clip 3
    Clip 4
    Clip 5
  • You can show each student in a group a different sections of the clip (like the 5 sections above) and then ask them to work together to describe the part they watched and put the different sections into the correct order as a group.
  • You can use the sections to focus on the use of specific structures, like this one for ‘should haveShould have clip or this one for the use of 3rd conditional 3rd conditional clip
  • At the end of these types of activities you can show them the complete clip. http://www.safeshare.tv/v/Tehft3GDw6k

What I like about it
  • It’s free and easy to use
  • It gets your students right to the part of the video you want them to see
  • It allows you to easily split videos into shorter clips
  • there’s a simple ‘bookmarklet’ that you can drag to your favourites bar, then whenever you find a YouTube clip your want to use you just click on it to get the SafeShare.TV link.
What I’m not so sure about
  • Sometimes it doesn’t work on my MAC
  • It would be great to have an embed code as well as a URL
Well those are some suggestions to get you started cropping YouTube videos. I hope you find them useful.

You can find 25 more video related activities for EFL and ESL students here.

Related links:
Best

Nik Peachey

Tuesday, 24 November 2009

10 Teacher Development Task for Web 2.0 Tools

Over the last couple of months I've been busy travelling round a bit and doing some face to face training and workshops. As part of the materials for these workshops I created a number of tasks for teachers which I hope will help develop their ability to use technology and to evaluate and create materials using web based tools. I've decide now to share those tasks so anyone who wants to use them to train other teachers or to develop their own skills can take advantage of and make good use of them.


There are ten tasks and they can be done in any order, except for the tenth one which should be last. Please feel free to use and share these tasks and by all means leave any comments or suggestions for improvement. I will also be hosting a teacher development week using and discussing these tasks and the related tools from 7th to 15th December 2009 on the SEETA Moodle site: http://www.seeta.eu/ so by all means come along for that if you want to share ideas and learn a bit more together.

10 Tasks to help teachers develop their use of learning technology

  • Task 1
    This task explores the use of TokBox, a synchronous and asynchronous video conferencing and communication tool. In this task you will look at and evaluate some teaching materials I have created using the tool and see how you can use it to create your own materials.
    Go to task

  • Task 2
    This task explores the use of Voxopop, a tool for the creation of web based audio discussion threads. In this task you will see how other teachers have used the tool and have the opportunity to participate and contribute to an online audio thread.
    Go to task

  • Task 3
    This task explores how Forvo, the web based pronunciation dictionary, works and what it can offer teachers and learners. In this task you will explore some of the entries and have a chance to add your own example pronunciations to the dictionary.
    Go to task

  • Task 4
    This tasks explores the design of Listen and Write, a tool for the creation of web based dictation activities. In this task you will be able to try a dictation exercise and see how autonomous learning is supported through the design of the tool. You will also have the chance to create your own activity.
    Go to task

  • Task 5
    This task explores the use of ESL Video, the web based video activity creation tool . In this task you will be able to examine and compare three different video activities to see how the tool can be exploited. You can then attempt to create your own activity based around a video clip of a bank robbery.
    Go to task

  • Task 6
    This task explores the use of 280 Slides, a web based tool for creating online presentations. In this task you will see how you can use the tool to add video or images to presentations and so create video based learning activities or multi media presentations.
    Go to task

  • Task 7
    This task explores the use of Dvolver, a very simple tool for creating animated movies. In this task you will be able to watch a video created using the tool and then evaluate its potential and limitations whilst creating your own animated video.
    Go to task

  • Task 8
    This task explores the use of Wallwisher, a web based 'sticky notes' notice-board. In this task you will be able to look at how the notice board has been used to share a range of web 2.0 tools and also have the opportunity to contribute your own favourite site to a notice-board to see how it works.
    Go to task

  • Task 9
    This task examines the use of Wordle, a web based tool for creating graphic representation of texts based on word frequency. In this task you will learn how to create your own graphic image based on a news article and explore some potential uses for the tool.
    Go to task

  • Task 10
    This final task looks at Penzu, a simple tool for keeping a web based journal. In this task you explore how to create your own journal and then create your own reflective journal entry based on the work you have done in the previous task.
    Go to task
I hope you find these tasks useful. Please do leave a comment or suggestion for improvement or any recommendations for links or other examples of materials created using these tools.

Related links:
Best

Nik Peachey

Tuesday, 27 October 2009

Creating an Online Journal for CPD

The importance of careful thought and reflection on what we do as both teachers and learners can not be overestimated in terms of the learning process and retaining information in a way that we can actually use it and make it part of our experience and practice.


Keeping a teaching or learning journal can be a really important part of this process of reflection and writing entries can help us to reformulate what we have read or analyse our experiences and draw conclusions from them which we can later return to, share and reflect on again.

For me Penzu is a really good tool which can help me and my students or trainee teachers to do this.

How to create your learning journal


  • You will need to create a password and enter a username, email address and agree to the terms of use. Then you just click on ‘Submit’.

  • You can then start creating your journal entries by adding a text and title. Each entry is dated automatically and you can move from one entry to another using the tabs on the right of the page.


  • To add pictures, you simply click on the ‘Insert Photo’ icon at the top of the page and locate an image on your computer and upload it.

  • Once you have uploaded your pictures you simply click to insert the ones you want to use.


  • The picture will appear in the margin and you can then drag it up or down to line it up with the text. Users click on the images to enlarge them.


  • To share journal entries you click on the share icon and this enables you to email your entry to someone else. You can either include your name and email along with a message or this can be done anonymously.


How we can use Penzu as a journal tool.
  • We can write short summaries of articles we have read and make a note of what our personal main points of interest or learning were from the article.
  • We can keep a journal of our teaching or training work and reflect on how classes went, compare these to our expectations and make notes of things we would like to try differently next time.
  • We can use it as an action research journal recording what we do in each lesson and setting out our objectives for the action research project. We can also ask students to use it to keep a journal of their reflections on our teaching and we can ask them to send us entries anonymously so that we can get unbiased feedback from our students on our teaching.
  • We can include it as part of a peer to peer development program and partner up teachers to watch each others classes, reflect on what they saw and send each other entries.
  • We can use it as a simple record of what we did in the class and what we want to do to follow it up in the next class.

The vital thing with all of these activities is that we return to our entries and reflect on what we wrote some time later. Immediate responses to what happens in our classes can be very subjective and emotional. If we record those responses and then come back to them at a time when we can be more objective we are often able to gain much greater insights into what happened in the class. In this way the journal enables us to capture thoughts and feelings that would otherwise be lost.

What I like about Penzu
  • It’s free and very simple to use.
  • The entries are private, but be can be shared
  • We can add images to make the entries more memorable
  • It can be accessed from anywhere
  • It’s quick and date stamps entries for us

What I’m not so sure about
  • It would be nice to be able to add a few hyperlinks (I think this is possible in the ‘Pro’ paid for edition.
  • It would be nice to have the option of having images in the text rather than just in the margin (again, probably available in the ‘Pro’ edition)

Well that’s about all I have to say about Penzu for now. I’ve focused on its uses as a tool for teacher development here, but it is also a great tool to use with students too. For more information on using Penzu with students check out my teaching manual Web 2.0 Tools for Teachers, which you can read or download for free.

Related links:
Best

Nik Perachey